Sharing with External Networks
Free/Busy
Free/Busy information is used by people sending meeting requests, to determine when you are available for meetings.
Event time is shown as busy in the case the event status is one of the following: busy, tentative, out of office. In the case the event status is free, the time is shown as free.
If more calendar folders are used, the final free/busy information merges all events (except for private ones) from all these folders, regardless of access rights set in permissions.
Microsoft Outlook supports this feature.
To share your Free/Busy information, do the following:
Microsoft Outlook 2007:
-
In the Outlook main menu:click the Tools - Options items.
-
On the Preferences tab, click the Calendar Options... button. The Calendar Options dialog appears.
-
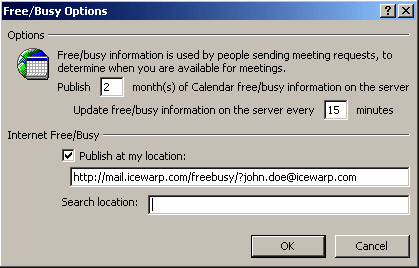
Click the Free/Busy Options... button. The Free/Busy Options dialog appears:

Figure. Free / Busy options.
-
Fill in the Publish ... and Update ... fields with adequate entries.
-
Check the Publish at my location box and fill the field below.
The proper URL syntax is: http://<my.server>/freebusy/?<my@address>.
Example see the figure above.
-
Click OK (three times) to set the option.
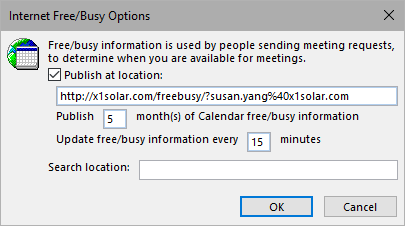
Note: In MS Outlook 2010 and 2013, select File - Options - Calendar - Free/Busy Options to access the Free/Busy Options dialog. In MS Outlook 2013, swap steps 4 and 5.
Free/Busy Subscription
The Search location: path (see above) tells Outlook where to look for other people's free/busy information.
Note: For additional information, refer to the IceWarp Knowledgebase pages.
Internet Calendars
Internet Calendars are calendars that are shared through Internet. These calendars are based upon a global Internet standard that allows calendar information to be exchanged between people regardless of the application that is used to create or view the information. Internet Calendars use the iCalendar format and the .ics file name extension.
Users can publish their Calendars using IceWarp GroupWare Server. This provides possibility to share own events with external users.
As Internet Calendars provide much more information than the Free/Busy feature, they are also more secure. Access rights for the default calendar folder are set via standard Permissions what gives users full control over their accounts.
Note: If you want to share your Calendar via Internet, you have to set access rights for your Events (Calendar respectively) folder for Everyone at least to Read and for events that you want to publish, you must not use the Private attribute.
It is possible to publish your calendar in two ways.
- Private authenticated - all events are displayed, including private ones. You will be presented with a browser authentication window and just supply your email and password to access your calendar. The appropriate address is webcal://<server>/calednar/.
- Public anonymous - only public events are displayed. The appropriate address is webcal://<server>/calendar/?<email_address>, where email_address is the address of the user whose calendar you want to see.
MS Outlook 2007 supports Internet Calendars.
Calendar Sharing
To share your Calendar information, do the following:
-
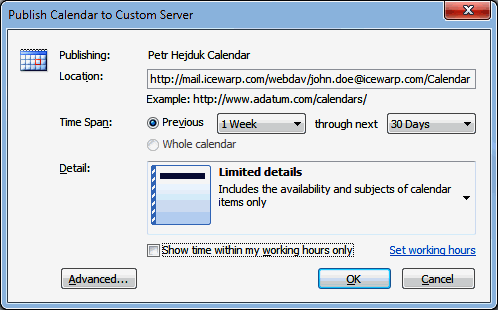
In the Outlook navigation panel, right-click the Calendar you want to share and select the Share Publish to WebDAV Server... items. The Publish Calendar to Custom Server dialog appears.
-
Fill in the URL into the Location field.
The proper URL syntax is: http://<my.server>/webdav/<my@address>/Calendar.
Example:

Figure. URL syntax.
-
Select the Time Span and Detail features (optional) and click OK.
Note: It is recommended to unCheck the Update this calendar with the server's recommended frequency option under the Advanced options.
Calendar Subscription
These calendars can be found on web sites where people host their calendars. Once having a link to such a web site, note that it begins with webcal://, instead of http://, and ends with a file name that has the .ics file extension.
To add shared Calendar, do the following:
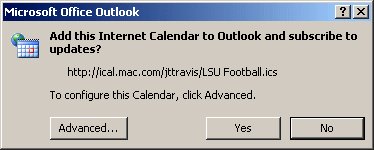
- Click the subscription link. The Add this Internet Calendar to Outlook and subscribe to updates? prompt appears:

Figure. Outlook prompt.
- Click Yes to add the Calendar.
The Internet Calendar opens in side-by-side view in the Outlook Calendar and is added to the Navigation panel in Calendar view under Other Calendars. The Calendar will check periodically for any updates made by the calendar publisher.

